
Introduction
We’ll use our new NodeJS knowledge to build a realistic web server that handles the backend of a messaging app for realtime chatting. We will also create a minimal front end so we can see the service working. These skills will be very applicable to those of you who are creating a web app for your project!
The Client/Server Relationship
Before we begin, let’s define the key actors in our client-server model. Follow along with this image.
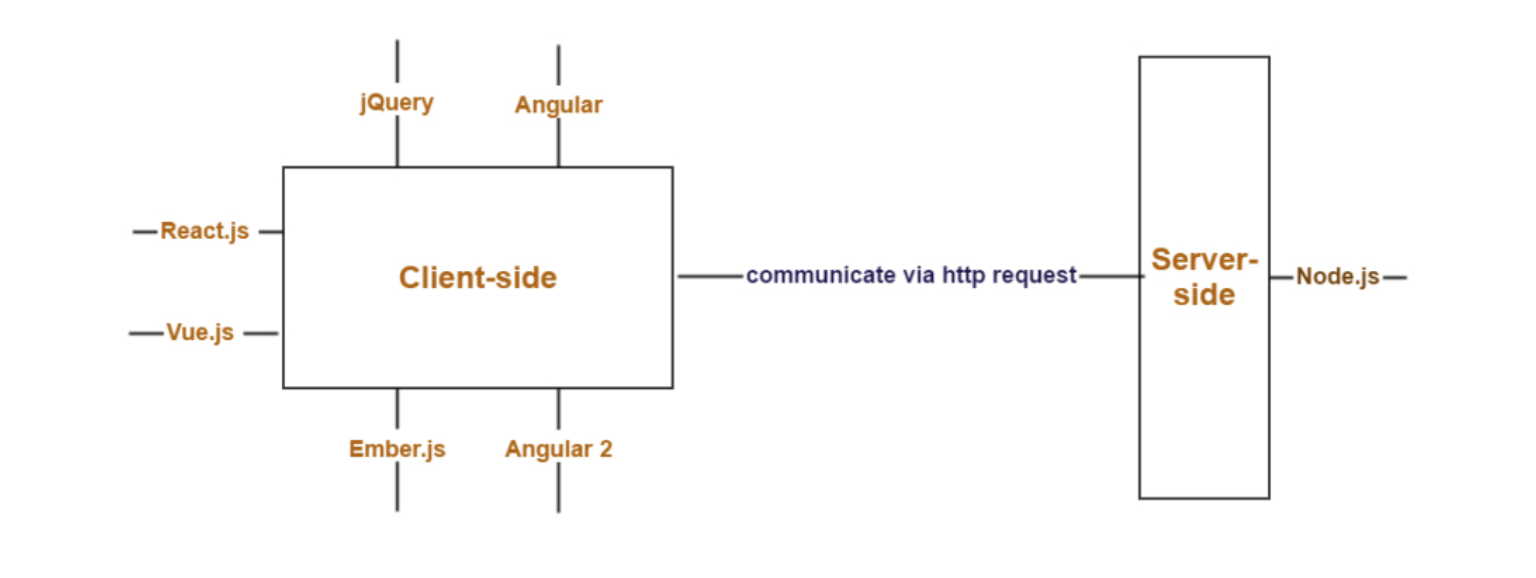
The client
The client makes requests to the server to get content or send actions. When we talk about "client-side" logic or the "front-end", we are referring to the HTML, CSS, and JavaScript code that is running in our browser or the Android/iOS layouts on our phone. This code has the primary objective of correctly rendering the website/app and providing an interactive interface for the user.
There are many front-end frameworks for JavaScript that make creating dynamic websites easier such as React, Angular, Fuse, jQuery and Vue, to name a few. Without these frameworks, we would have to create interactive websites using vanilla(pure) JavaScript code and HTTP requests.
The Server
The server is exactly what it sounds like: it "serves" (sends) things to those that want them. When we talk about "server-side" logic or the "back-end", we’re talking about code that runs on the server, with the overall objective of serving the requested content. We can run whatever software we want in our server as long as it fulfills the objective of serving files. A popular option is Node.js and other popular back-end options include Django (Python), Flask (Python), Ruby on Rails (Ruby), and Spring MVC (Java).
Building a NodeJS Server
Communication between the client and server
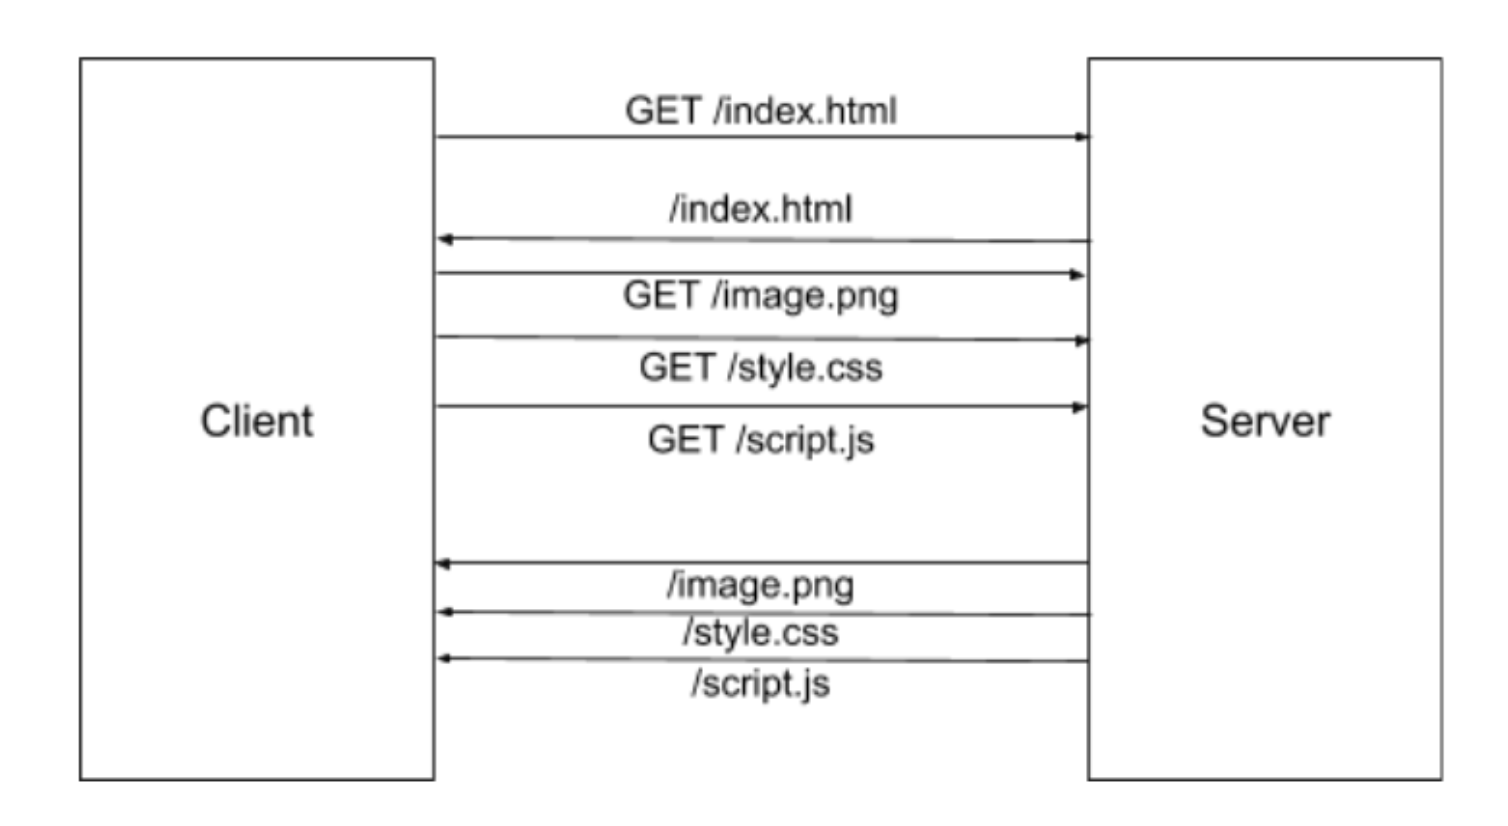
Any good relationship requires communication. So how do the client and server talk to each other? A basic website can be requested from the server through a HTTP Request. This is a request from the client to the server for a certain file, such as "index.html", which the server proceeds to send. HTTP Requests can only be initiated from the client, and they can have different "verbs," which tell the server what to do. A GET request typically asks for a static resource like a webpage. A POST request typically asks the server to create or update data on the server.
Each HTTP Request spawns a new connection. What if we want to keep a channel of communication open so that the client and server and continually connected? If the server supports it, the client can also use a different method of communication called WebSockets. This protocol supports a more real-time method to communicate, and is used in situations when rapid real-time communication is required such as a chat app or a multiplayer game.
We will first implement our Chat app with POST requests, then again with WebSockets to demonstrate both of these technologies. Let’s get started!
First off, let’s create the project directory we are going to work in. Type the following in the terminal:
$ cd
$ mkdir chatapp
$ cd chatapp
NPM and Node packages
One reason why Node.js is so popular is that there exists a thriving community around it which creates useful packages that anyone can use in their Node projects. We can import these packages to our own project, just like how we imported modules to our files earlier. We will use a package, called Socket.io, which allows us to communicate with the clients connected to our server in real time using WebSockets, a communication protocol.
We will also use Express, a package that allows us to handle backend routing for our website. Each HTTP request includes a path for the requested resource. Routing allows us to define which webpage to serve for the requested URL. (Much more on these frameworks coming up!)
NPM is a package manager which allows us to download and manage the packages we wish to import into our project, as well as our Node project as a whole.
We can use NPM to create a barebones project directory to get started. Let’s do that with the npm init command:
$ npm initThis command creates a file called package.json. This file is essential to Node.js development as it contains important information about our project and our package dependencies.
Fill out the following details as the command asks for them:
Package name: "chatapp"
Version: Just press enter
Description: "Simple chat app"
Entry point: "server.js"
    This is the file that starts our server.
    (Where "main" method is.)
Test command: Just press enter
Git repository: Just press enter
Keywords: Just press enter
Author: Your name
License: Just press enter
Is this ok?: "yes"
The ability to install and use open source libraries is one of the reasons why Node.js is so powerful. Lets download and install the two aforementioned packages we want to use with the npm install command.
npm install --save express body-parser socket.ioNow check your package.json. Notice that npm install installs the package we specify into the node_modules folder, and the –save flag adds it as a dependency in our package.json.
Creating a Server
Lets create a simple "hello world" HTML page as the first page on our site. Create a new file index.html and add whatever you like to it. Just make sure it at least has a body and 1 visible element.
Create and open server.js. This will contain the main back-end logic for our server. Paste the below code into it to import the libraries we need:
var express = require('express');
var http = require('http');
var app = express();
var httpServer = http.createServer(app);

httpServer.listen(3000, function(){
    console.log("Listening on port 3000");
});
Step by step explanation of the code
var express = require('express');
var http = require('http');
First we import the packages necessary for starting a server. Namely express and the built-in http package.
var app = express();
var httpServer = http.createServer(app);
Next we create the app and server. The app object defines the behavior for our application, such as what to do when the user requests for a certain resource. The httpServer object is an interface between the application and the client connection, which means when the client makes a request, the server will notify our app of the request.
httpServer.listen(3000, ...);Finally, our server starts listening to port 3000 for incoming requests. We also supply a callback that is called when the server starts up.
Run npm start to start the app, and access localhost:3000 on your browser. What do you notice in the terminal? In the browser? (Don’t be alarmed if you see an error)
The Request/Response Model
Oh no! When we open our browser to the page, all we get is an error that says
Cannot GET /So, is our server up and running?
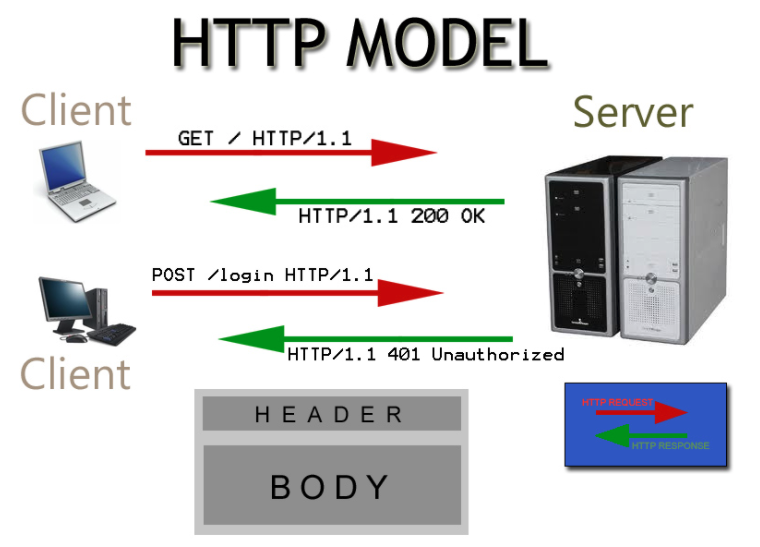
The truth is, our server is running normally. The console message is evidence for that. But remember, our app object defines the behavior of our application. We still haven’t defined what it should do yet! We mentioned earlier that HTTP uses a request / response model for communicating. First the client requests some resource, occasionally including extra headers or body to add specific details to the request. Then on receipt of the request, the server returns a response with either the data requested, an error, or some other appropriate response. Here is a simple illustration of this:
Now, we need to define how to GET /, so that the server can serve index.html to the client. We can do this easily using the get() method. Add the following to server.js and try to understand what it’s doing.
app.get('/', function(req, res) {
console.log("Received GET request for resource /");
res.sendFile('index.html', { root: __dirname });
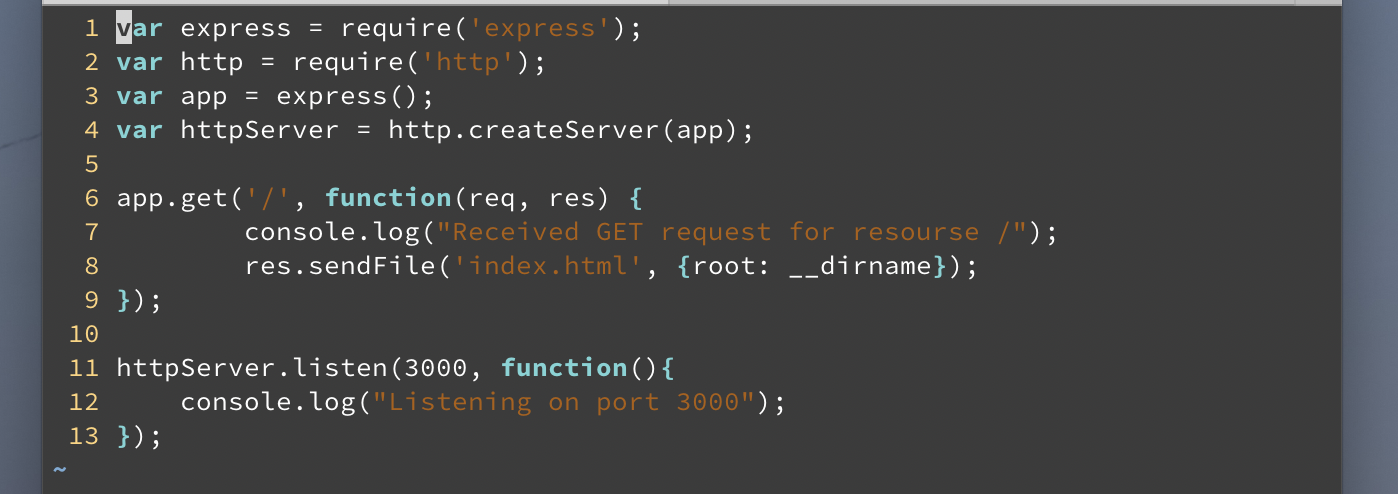
});The get() function defines our function to be called when the client requests ‘/’, and res.sendFile gives a "200 OK" response with index.html as the body. Our server.js should now look like this:
Access localhost:3000 now after running npm start and now we can see our index.html being rendered! Our current GET callback is very basic. The behavior does not change regardless of the client’s request, so we say that it is serving static content. We can confirm this is the case since the req parameter, which contains the request data, is not used. It would be troublesome if we had to define an endpoint for every single static resource (an app.get() call for every file single file!), but luckily there is an easier way. First, create a new subdirectory "src" and move index.html into that directory.
Now in server.js, replace the app.get() call with the following code:
app.use(express.static('src'));The line above adds middleware for the application to handle static content. Middleware is a generic callback, usually a library, that handles only requests that are relevant to it. It will usually either transform the request to make it easier to process, or handle it entirely. In our case, if the express.static() middleware sees a request that starts with /src, it will automatically handle the request by sending the relevant file to the client.
Restart the serverand visit localhost:3000 again, and make sure the page still loads correctly. Even though we are accessing resource ‘/’, our app will know to access ‘/index.html’, since that is the default behavior for web servers.
Note that now our app will not log the GET request anymore. We can fix this with middleware of our own. Add the following middleware function to your app above the original app.use() call:
ar myLogStatement = function(req, res, next) {
    console.log("Received", req.method, "request for resource", req.path, "from", req.ip);
    next(); // callback to the middleware function
}
Now that we’ve defined our middleware function, we need to include it in our server’s pipeline. Assign the myLogStatement function as middleware, similar to how you added the express.static() middleware using app.use
Restart the server and watch the console when you access the page from your browser.
For this middleware, we use the req object to provide us information about the request, and next() to call the next handler in the middleware chain. Essentially, we can log the request without consuming it. This means that order in which we declare middleware matters!
Serving Dynamic Content
So far everything we’ve done has been regarding static, unchanging content. In order to support our chat app, we will need something more powerful so that the page can change responsively to user actions.
After we change the html and css file for our chat app. Everything is set in place, but alas when something is typed in no messages appear. Our first task here is to show our own messages. Since no communication is required for this, we can use a simple client-side script.
Create and open a new file script.js in the src directory, and copy the following code into it:
var inputElem = document.querySelector('.chatMessage');
var messages = document.querySelector('.messages');

function createHTMLMessage(msg, source){
    var li = document.createElement("li");
    var div = document.createElement("div");
    div.innerHTML += msg;
    div.className += "messageInstance " + source;
    li.appendChild(div);
    messages.appendChild(li);
}

inputElem.addEventListener('keypress', function (e) {
    var key = e.which || e.keyCode;
    if (key === 13) {
    createHTMLMessage(inputElem.value, 'client');
    inputElem.value = "";
    }
});
Explanation:
- The createHTMLMessage() function is a helper that takes a message and a source (either "client" or "server"), and generates an html element for that single message.
- inputElem.addEventListener(…) detects when "Enter" (key code 13) is pressed inside the bottom text box. When it is, is creates a client message using the inner text and adds it directly to the page. Finally, it clears the text field.
Test the updated page, and now we can see our own messages being populated in the list. However, there is still no communication between separate clients, so let’s take care of that next.
The POST Request
There are couple of ways we can add dynamic content, so we’ll start with the most basic way first which is the POST request. What makes POST different from GET is that the client can send parameters or other content through its body which can change the nature of the request, and the returned data does not have to be a static resource. Query results are often returned as JSON (JavaScript Object Notation). JSON is a generic representation of key-value pairs that can be nested, and thus can represent virtually any possible response data.
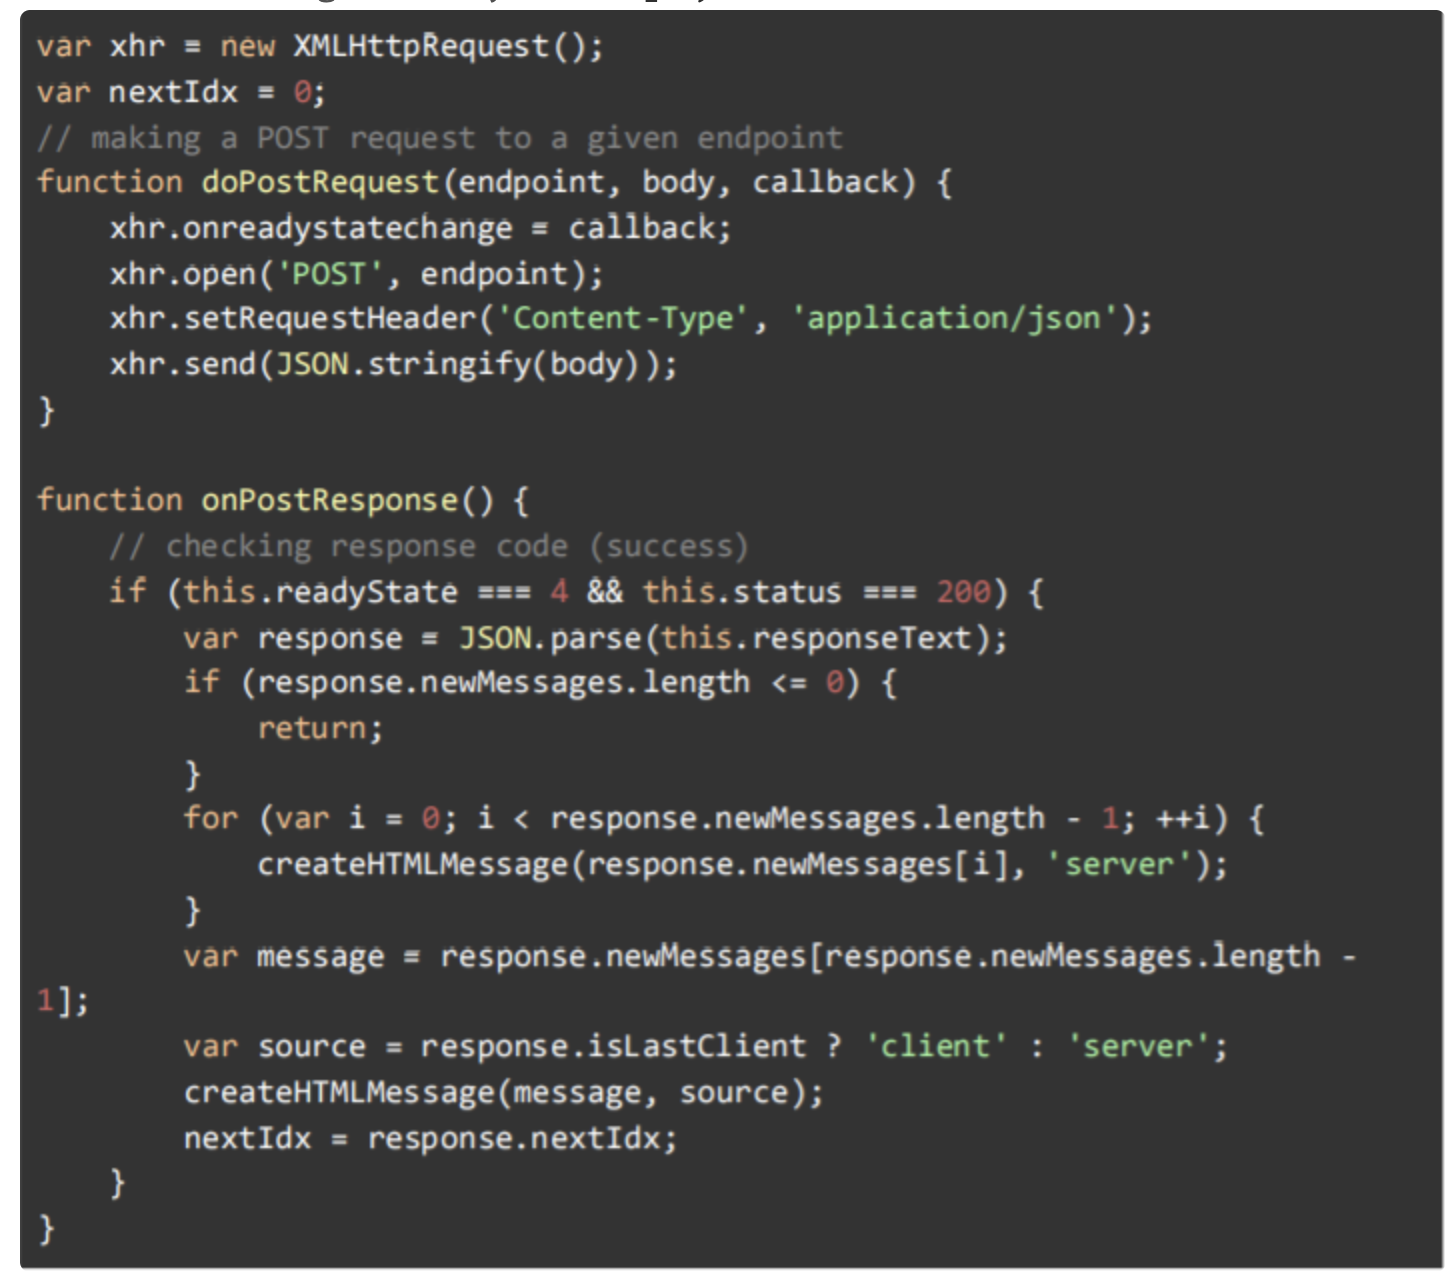
In order to make POST requests dynamically, we will be making use of XHRs (XMLHttpRequests) to make requests from JavaScript on the fly.
Add the following code to your script.js file:
In addition, replace the createHTMLMessage() line in inputElem.addEventListener(…) with the following:
doPostRequest('/newMsg', {
    msg: inputElem.value,
    nextIdx: nextIdx
}, onPostResponse);
Explanation:
-
First, we create the XHR object that we will use to make requests at the top of the script. Then we add a doPostRequest() function which makes it convenient to make POST requests.
xhr.onreadystatechange = callback;
Assigns the event handler which is called when the readyState for the XHR request changes.xhr.open(‘POST’, endpoint);
We then open the endpoint as a POST request.xhr.setRequestHeader(‘Content-Type’, ‘application/json’);
Sets the ‘Content-Type’ header to indicate JSON will be transmitted.xhr.send(JSON.stringify(body));
Finally send the JSON body. -
Next, we add an onPostResponse() callback that will wait until the request is done (readyState = 4) and is successful (status = 200). Then it will take any new messages the server sent and append them to the page as "server" chat bubbles. It will append the last message as a "client" chat bubble, since the server will send the message back.
-
Finally, we add a line in our inputElem handler to make the post request to the ‘/newMsg’ endpoint using doPostRequest().
We have now defined the client-side logic in script.js that makes POST requests and have added a callback that defines what to do once the server responds to our request. This will hook in the client side, and we can see that POST requests are being made to the server through the server’s logs. After implementing the above, you should see this printed on your console.
Received POST request for resource /newMsg from ::1However, the server side hasn’t been implemented yet (you shouldn’t see any change on the browser). We have added code to the client that makes requests haven’t defined what happens when the server receives a POST request.
We will add server-side logic to define how to handle POST requests next, but first we need an extra package. In order to parse the body as JSON, we need to use the body-parser package. Here is how we can add it to server.js:
- Add the following line at the top of server.js:
var bodyParser = require('body-parser'); - Use the body-parser middleware, bodyParser.json().
It should be added above all other middleware we use. If you need a refresher on how to add middleware, check the end of the last unit (Hint: app.use).
Now that body-parser is added, we can handle our POST request. Add the following code to server.js. It should be added below our logging, but above the static resource middleware.
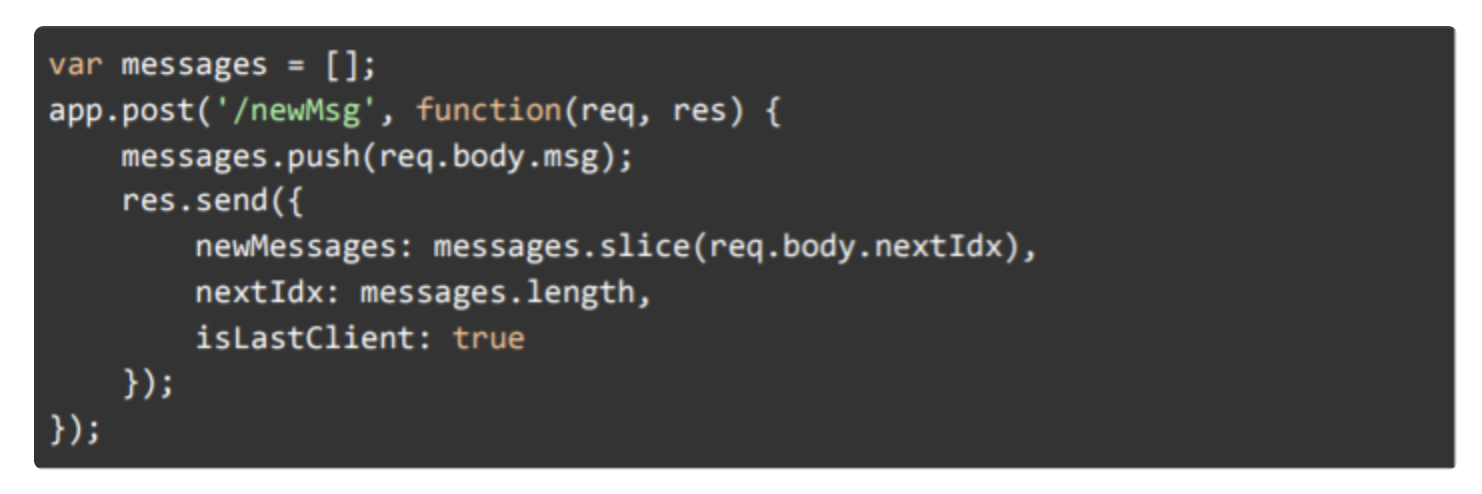
The most important thing to note about the server-side code is that the client’s request parameters are kept in req.body() as JSON that we can use immediately. Then we can return our own JSON back to the client.
var express = require('express');
var http = require('http');
var bodyParser = require('body-parser');
var app = express();
var httpServer = http.createServer(app);
var messages = []

/*
app.get('/', function(req, res) {
    console.log("Received GET request for resource /");
    res.sendFile('index.html', { root: __dirname });
});
*/

//app.use(express.static('src'));

app.use(bodyParser.json());

var myLogStatement = function(req, res, next) {
    console.log("Received", req.method, "request for resource", req.path, "from", req.ip);
    next(); // callback to the middleware function
}

app.use(myLogStatement);

app.post('/newMsg',function(req,res){
    messages.push(req.body.msg);
    res.send({
        newMessages: messages.slice(req.body.nextIdx),
        nextIdx: messages.length,
        isLastClient: true
    });
});

app.use(express.static('src'));

httpServer.listen(3000, function(){
    console.log("Listening on port 3000");
});
Now everything is finally hooked together. Open two separate tabs or windows and try to send messages between windows.
Quick note on how the chat system is implemented:
The server has a messages array that stores every message sent so far. Each client keeps track of a variable nextIdx which stores the index of their next message. On receiving a request, the server returns a subarray of messages starting at nextIdx field included in the request. Note that this subarray will include the message just sent by the client, and other outstanding messages that the client might have not received yet. Try to go through the logic yourself and see how the clients and server keep track of the messages!
Awesome, well except the fact that messages only get received after a client sends a new message. Luckily, there is a simple solution: polling. In essence, all the client needs to do is manually check every so often to see of there is any updates.
Add another POST endpoint to server.js, similar to ‘/newMsg’ with the following changes:
- The endpoint should be ‘/’
- No message should be added to our server’s array (since we just want to respond with new data).
- The server should respond with any new messages and the new index, similar to our old endpoint.
- isLastClient should be false, since all new messages will come from the server
Then add the following code to script.js:
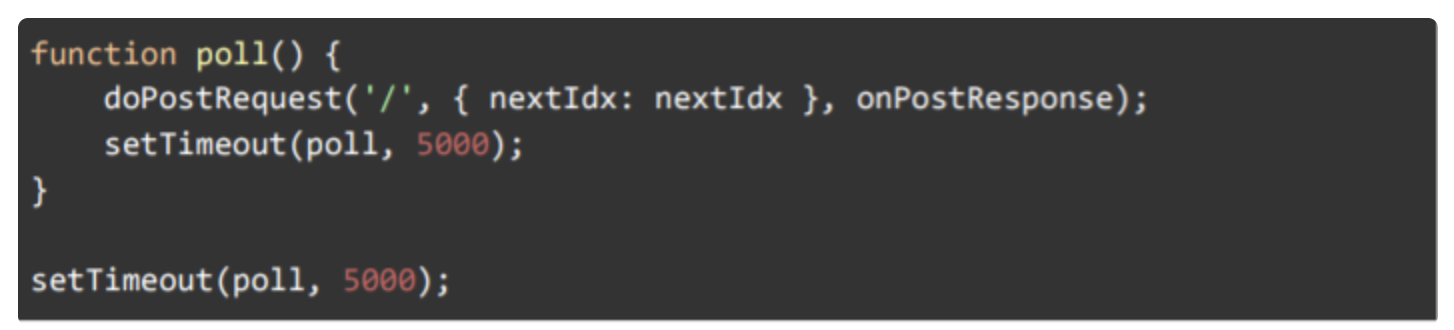
Now when you test two separate windows again, they both update automatically every 5 seconds. This is definitely an improvement, but there is still some awkwardness about the method. When sending messages, there will be no contact for 5 seconds then a sudden burst of messages all at once. We could mitigate the issue by lowering the time between polls, but then how low can we make it before performance starts to degrade? There is a much better solution that fits this problem.